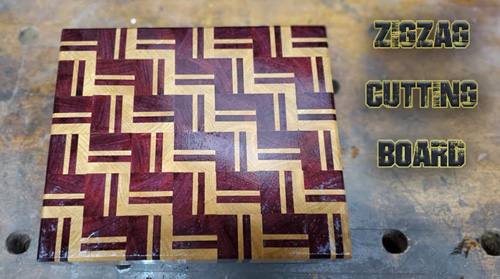
How To Make A Zig Zag Cutting Board? 9 Easy Step
Looking to add a unique touch to your kitchen? Why not make your own zig zag cutting board? Not only will it add personality to your space, but it’s also a fun and easy project to take on.
Plus, it’s a great way to show off your woodworking skills. Keep reading to learn how to make a zig zag cutting board of your very own.
How To Make A Zig Zag Cutting Board?
Creating a zigzag pattern on a cutting board involves arranging wooden strips in a back-and-forth or zigzag design. This pattern adds a unique and stylish element to the cutting board’s appearance. Here’s a step-by-step guide on how to make a zigzag cutting board:
Materials You’ll Need:
- Hardwood strips of different species and colors
- Wood glue
- Clamps
- Table saw or miter saw
- Planer (optional)
- Sandpaper (various grits)
- Food-safe finish (such as mineral oil or food-safe butcher block oil)
- Safety equipment (goggles, ear protection, dust mask)
Steps:
- Prepare the Wood Strips:
- Choose hardwoods of various colors and species for a visually appealing zigzag pattern.
- Cut the hardwood strips into uniform widths and thicknesses. Strips that are around 1/4 to 3/8 inch wide work well.
- Cut the Strips at a 45-Degree Angle:
- Set your table saw or miter saw to a 45-degree angle.
- Cut the ends of each strip at a 45-degree angle. These angled ends are essential for the zigzag pattern.
- Create the Zigzag Pattern:
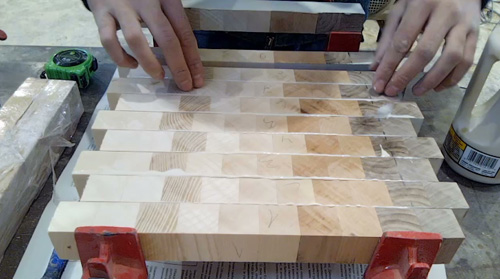
- Lay out the angled strips side by side on a flat surface to create the zigzag pattern. Alternate the direction of the angled ends to achieve the back-and-forth design.
- Glue and Clamp:
- Once you’re satisfied with the zigzag pattern, apply a thin layer of wood glue to the edges of the strips where they intersect.
- Press the strips together, ensuring they’re aligned properly. Use clamps to hold the strips in place while the glue dries. Clean off any excess glue.
- Allow Glue to Dry:
- Follow the glue manufacturer’s instructions for drying time. Make sure the glue is completely dry and cured before proceeding.
- Trim and Flatten:
- After the glued sections are dry, trim the edges of the zigzag panel using a table saw or miter saw to create clean, straight edges.
- Plane the surface if necessary to achieve a flat and even result. You can also use sandpaper or a belt sander to smooth the surface.
- Finish:
- Sand the entire zigzag cutting board to a smooth finish. Start with a coarser grit and progressively move to finer grits.
- Apply Finish:
- Apply a food-safe finish, such as mineral oil or food-safe butcher block oil, to protect the wood and enhance its appearance. Follow the manufacturer’s instructions for application and drying times.
- Final Touches:
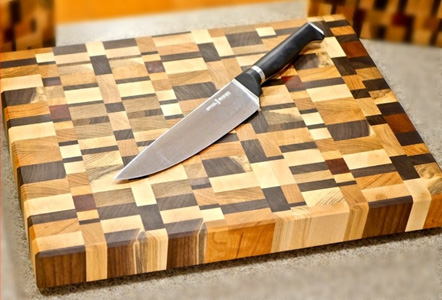
- Once the finish has dried, your zigzag cutting board is ready to use and display.
Creating a zigzag pattern requires careful alignment of the angled ends. Take your time to ensure that the pattern is consistent and visually appealing. Prioritize safety by using proper safety gear and tools throughout the process.
Credit: www.reddit.com
How do you make a zig zag end grain cutting board?
If you’re looking for a unique and interesting cutting board, why not try making a zig zag board? This tutorial will show you how to make your own zig zag cutting board, using only a few simple supplies.
First, you’ll need a piece of wood that is at least 18 inches long and 8 inches wide.A 1×8 board works well for this project. You’ll also need a jigsaw and a drill. To start, mark out a zig zag pattern on your board.
You can freehand this, or use a template. Then, use your jigsaw to cut along the lines you’ve drawn. Once your zig zag pattern is cut, use your drill to make two pilot holes at each end of the board.
These pilot holes will be for the screws that will hold the two halves of the board together. Now it’s time to assemble your board.
How do you make a chevron cutting board?
If you’re looking for a unique and interesting cutting board, why not try making a zig zag cutting board? It’s actually not as difficult as it looks, and it’s a great way to add a bit of personality to your kitchen. Here’s how to do it:
First, you’ll need to gather your materials. You’ll need a piece of wood (preferably hardwood), a saw, sandpaper, wood glue, clamps, and something to use as a template (a ruler or straight edge will work fine).
Next, cut your wood into strips that are about 1.5 inches wide.
You’ll need enough strips to make your desired cutting board size.
Once you have your strips cut, it’s time to start glueing them together. Apply a generous amount of wood glue to the end of one strip, and then place another strip on top at a 90 degree angle.
How do you make a herringbone cutting board pattern?
If you’re looking for a unique and eye-catching cutting board, then you’ll love this zig-zag design! Not only does it look great, but it’s also super easy to make. Here’s what you’ll need:
-1 piece of wood, at least 18″ long and 12″ wide
-1 saw
-1 drill
-1 jigsaw
-1 sander
-1 router
-1 set of clamps
-1 set of food-safe finish (we used mineral oil)
First, you’ll need to cut your piece of wood into three equal pieces.
Then, take two of the pieces and drill three evenly spaced holes along the long side of each piece. Next, use the jigsaw to cut a zig-zag pattern along the length of each piece.
Now it’s time to join the pieces together!
How do you make patterns on a cutting board?
If you’re looking for a unique and Eye-catching cutting board, look no further than the Zig Zag Cutting Board. This board features a unique zig zag pattern that is sure to stand out in your kitchen. But how do you make one?
It’s actually quite easy!
Here’s what you’ll need:
-1 piece of hardwood, at least 18″ long and 8″ wide
-A saw
First, you’ll need to cut your hardwood into strips that are about 1″ wide. You can use a saw or a handheld power tool for this. Once the strips are cut, it’s time to start assembling the zig zag pattern.
Start by laying two strips down side by side. Then, take the third strip and zig zag it over the first two strips. Continue this pattern until all strips are used up.
Plans for making 3d cutting board
Making a zigzag cutting board is a great way to add a unique touch to your kitchen. This type of cutting board is also very functional, as it provides a place to chop vegetables or meat without having to worry about the knife slipping. Here are some easy steps to follow to make your own zigzag cutting board.
1. Start by choosing the wood that you want to use for your cutting board. You can use any type of hardwood, such as maple or oak. Avoid using softwoods, such as pine, as they will be more difficult to work with and are more likely to warp over time.
2. Cut the boards that you will use for your cutting board to the desired size. Make sure that the boards are all the same thickness so that they will be easy to work with. 3. Using a router, cut a series of parallel lines into one side of each board.
Zig zag cutting boards
A zigzag cutting board is a great way to add a unique touch to your kitchen. If you’re looking for a cutting board that is both functional and stylish, a zigzag cutting board is the perfect option. Here’s how to make your own zigzag cutting board:
1. Start by cutting your wood into strips that are 1-2 inches wide. You’ll need enough strips to make a zigzag pattern that is about 12 inches wide.
2. Next, arrange your strips in a zigzag pattern and glue them together.
3. Once the glue has dried, sand the edges of your cutting board to make sure they’re smooth.
4. Finally, apply a food-safe finish to your cutting board. You can use mineral oil, beeswax, or a similar product.
Your zigzag cutting board is now ready to use!
How to make pattern cutting board
A zig zag cutting board is a great way to add some flair to your kitchen. It’s a simple project that anyone can do, and it’s a great way to show off your woodworking skills. Here’s how to make one:
1. Start by cutting your boards to size. You’ll need two boards that are the same width, and one board that is slightly wider. The wider board will be the base of your cutting board.
2. Cut the boards into strips, making sure that the strips are all the same width.
3. Glue the strips together, alternating between the two different boards.
4. Once the glue is dry, sand the edges of your cutting board to smooth them out.
5. Finish the board by applying a food-safe finish of your choice.
How to make a keyboard cutting board
Zigzag cutting boards are a great way to add a touch of style to your kitchen. They are also a very practical cutting board that can be used for a variety of tasks. Here is a step by step guide on how to make your very own zigzag cutting board.
1. Start by cutting two pieces of wood that are the same size. These will be the sides of your cutting board. 2. Next, use a router to create a groove in one of the pieces of wood.
This groove will be used to insert the other piece of wood. 3. Now, take the second piece of wood and cut it into a zigzag pattern. Make sure that the zigzags are evenly spaced.
4. Next, insert the zigzag piece of wood into the groove of the other piece of wood. 5. Use a belt sander to sand down the edges of the cutting board.
3d cutting board plans pdf
Assuming you would like a blog post discussing how to make a zigzag cutting board:
A zigzag cutting board is a great way to add a unique touch to your kitchen. Plus, it’s a great way to use up any scrap wood you may have lying around.
Here’s how to make your own zigzag cutting board:
1. Start by cutting your wood into strips. The width of the strips will determine the final width of your cutting board, so make them as wide or as narrow as you like.
2. Once you have your strips cut, it’s time to start creating the zigzag pattern. To do this, alternate attaching the strips together at the top and bottom.
3. Once all of the strips are attached, use a belt sander or hand sandpaper to even out the surface of your cutting board.
Printable cutting board designs
Start by finding a cutting board that is the right size and shape for your needs. If you are unsure, you can always trace the outline of your desired cutting board onto a piece of cardboard or paper and then use that to find a board that is the right size. Once you have your cutting board, use a saw to cut it into the desired zigzag shape.
You may need to use a jigsaw for this if your cutting board is too thick to be cut with a regular saw.
After you have cut your cutting board into the desired shape, sand the edges to smooth them out. You can then finish the board by applying a food-safe finish, such as mineral oil or beeswax.
Allow the finish to dry completely before using your new cutting board.
Conclusion
This blog post details how to make a zig zag cutting board. The first step is to create a template out of cardboard or thin wood. Then, use a saw to cut along the template.
Once the template is cut, sand the edges and finish as desired.