How To Glue Up End Grain Cutting Board? 12 Easy Step
Creating an end grain cutting board is a satisfying woodworking project that not only results in a functional kitchen tool but also showcases intricate patterns and the beauty of different wood species. One critical step in crafting a durable and visually appealing end grain cutting board is the glue-up process. Gluing up the end grain not only ensures the board’s strength but also contributes to its distinctive appearance.
In this guide, we’ll explore the step-by-step process of How To Glue Up End Grain Cutting Board, from selecting the right wood to achieving a seamless bond between the individual pieces. Whether you’re a woodworking enthusiast or simply looking to craft a unique and practical addition to your kitchen, mastering the art of gluing up an end grain cutting board is an essential skill to create a lasting and impressive culinary tool.
How To Glue Up End Grain Cutting Board?
Gluing up an end grain cutting board involves assembling the individual pieces of wood in an arrangement that showcases the end grain for both its durability and aesthetic appeal. Here’s a step-by-step guide on how to glue up an end grain cutting board:
Materials You’ll Need:
- Hardwood pieces for the cutting board (various species and colors)
- Wood glue (food-safe and waterproof)
- Clamps
- Bar clamps or pipe clamps
- Biscuit joiner (optional)
- Planer (optional)
- Table saw or miter saw
- Sandpaper (various grits)
- Food-safe finish (such as mineral oil or food-safe butcher block oil)
- Safety equipment (goggles, ear protection, dust mask)
Steps:
- Prepare the Wood:
- Choose hardwoods of different colors and species for an attractive end grain pattern.
- Mill the wood pieces to uniform thickness and width. End grain boards are often thicker (around 1.5 inches) than face grain boards to enhance their durability.
- Create the Design:
- Plan the design and arrangement of the wood pieces for your cutting board. Arrange the pieces in a way that creates a visually pleasing pattern.
- Cut and Assemble the Pieces:
- Cut the wood pieces to length according to your design.
- Arrange the pieces in the desired pattern, ensuring that the end grain faces upward.
- Glue Application:
- Apply a generous layer of wood glue to the mating surfaces of the wood pieces. Use a brush or a roller to ensure even coverage.
- Consider using a food-safe and waterproof glue for maximum durability and safety.
- Joining with Biscuits (Optional):
- Use a biscuit joiner to cut biscuit slots into the edges of the wood pieces. This can help with alignment during assembly and improve the overall strength of the glue-up.
- Insert biscuits into the slots and apply glue to the biscuits before assembling.
- Assembly:
- Carefully align and press the wood pieces together to form the cutting board. Ensure that the end grain faces upward and that the pieces fit tightly together.
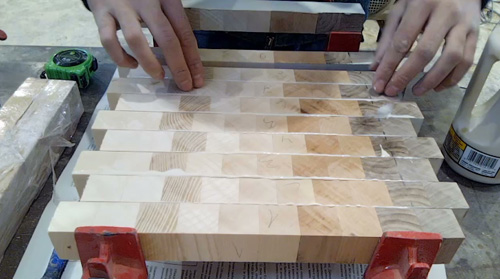
- Clamping:
- Place clamps across the width of the assembled cutting board to apply even pressure and ensure a strong bond.
- Use bar clamps or pipe clamps along the length of the cutting board. Tighten the clamps gradually to avoid uneven pressure and misalignment.
- Cleanup:
- Wipe off any excess glue that squeezes out from the joints using a damp cloth or sponge.
- Allow Glue to Dry:
- Follow the glue manufacturer’s instructions for drying time. Allow the glue to cure completely before moving on to the next steps.
- Trim and Flatten:
- After the glue is fully cured, remove the cutting board from the clamps.
- Trim the edges of the cutting board using a table saw or miter saw to create clean, straight edges.
- If necessary, plane the surface to achieve a flat and even result.
- Sand and Finish:
- Sand the entire surface of the cutting board to a smooth finish, starting with a coarser grit and progressing to finer grits.
- Apply a food-safe finish, such as mineral oil or food-safe butcher block oil, to protect and enhance the wood’s appearance.
- Final Touches:
- Once the finish is dry, your end grain cutting board is ready to use and display.
Creating an end grain cutting board requires careful attention to detail, especially during glue-up. Take your time to ensure proper alignment and a strong bond. Always prioritize safety by using proper safety gear and tools throughout the process.

Credit: craftedworkshop.com
What glue is used on end grain cutting board?
End grain cutting boards are extremely popular because they are both beautiful and durable. They are also very easy to make! You can find end grain cutting boards made from all sorts of different woods, but the most popular choices are cherry, maple, and walnut.
The first step in making an end grain cutting board is to select the pieces of wood you will use. You will need four pieces of wood that are all the same thickness. The thickness of the wood will determine the thickness of your cutting board, so make sure to select pieces that are at least 1” thick.
Once you have selected the pieces of wood you will use, it’s time to glue them together. Start by spreading a thin layer of wood glue on one of the pieces of wood. Then, place one of the other pieces of wood on top of the glued piece, aligning the edges.
Repeat this process with the remaining two pieces of wood.
Can you glue end grain wood?
If you’re looking for a durable cutting board that will last for years, an end grain cutting board is the way to go. These cutting boards are made by gluing together small pieces of wood so that the grain is running perpendicular to the surface of the board. This makes for a cutting surface that is much more forgiving on your knives and is less likely to show wear and tear.
End grain cutting boards can be a bit more challenging to make than your average cutting board, but the results are worth it. Here’s a step-by-step guide to help you make your own end grain cutting board.
1. Start by cutting your wood into small pieces that are all the same size.
The pieces should be around 1-2 inches square.
2. Next, arrange your pieces of wood into a pattern that you like. Be sure to alternate the direction of the grain so that the board will be strong and sturdy.
Can you glue end grain?
When gluing up an end grain cutting board, the first thing you need to do is make sure all of your pieces are the same thickness. If they are not, you will need to plane them down so that they are even. Next, lay out your pieces in the order that you want them to be glued up.
Then, take a small brush and spread a thin layer of glue on each piece. Be sure to not use too much glue, or it will seep out and make a mess. Once all of your pieces are glued, clamp them together and let them dry overnight.
The next day, unclamp your board and sand it down so that the seams are flush. Then, finish it off with your choice of oil or wax.
What is the best glue for end grain?
When gluing up an end grain cutting board, you will need to use a strong adhesive that can withstand the wear and tear of a cutting board. We recommend using Titebond II Premium Wood Glue. You will also need clamps to hold the boards together while the glue dries.
To begin, apply a generous amount of glue to the end of one of the boards. Then, place the end of the other board onto the glue and clamp the two boards together. Repeat this process for the remaining boards.
Once all of the boards are glued and clamped together, let the glue dry overnight. Then, unclamp the boards and sand the edges to create a smooth surface.
Now your end grain cutting board is ready to use!
How to smooth end grain cutting board
If you’re looking for a tough cutting board that can take a beating, look no further than an end grain cutting board. End grain cutting boards are made by gluing together blocks of wood so that the end of each piece of wood is facing up. This type of construction makes for a cutting board that is very strong and durable.
End grain cutting boards can be a bit challenging to glue up, but with a few tips and tricks, it’s not too difficult. Here’s what you need to know: 1. Make sure all of your pieces of wood are cut to the same size.
This will make the gluing process much easier. 2. Use a good quality wood glue. This will make the bond between the pieces of wood stronger and less likely to come apart.
3. Clamp the pieces of wood together tightly. This will ensure that the glue dries evenly and that the bond is strong.
End grain cutting board calculator
If you’re looking for a challenging woodworking project, try your hand at making an end grain cutting board. It’s a bit more difficult than making a regular cutting board, but the results are worth it!
To start, you’ll need to glue up the end grain pieces of wood.
This can be a bit tricky, but here are a few tips to help you out.
First, use a good quality wood glue. We recommend Titebond II or III.
Next, clamp the pieces of wood together using bar clamps or pipe clamps. Make sure the clamps are tight so the glue will bond properly.
Now, let the glue dry overnight.
Once the glue is dry, you can sand the cutting board to make it smooth.
If you follow these steps, you’ll end up with a beautiful end grain cutting board that will last for years to come!
Cutting board glue up
End grain cutting boards are beautiful, functional pieces that can last a lifetime with proper care. They’re also notoriously difficult to glue up properly. Here are a few tips to get a strong, lasting bond when gluing up your end grain cutting board.
1. Use a strong glue.Wood glue is fine for most projects, but end grain cutting boards need a stronger adhesive to withstand the constant chopping and cutting. We recommend using an epoxy or polyurethane glue.
2. Clamp, clamp, clamp.
End grain is very porous, so you need to clamp the boards tightly together while the glue dries. Use as many clamps as you can, and apply even pressure to avoid any gaps.
3. Use a glue spreader.
Applying glue to each individual board can be time-consuming and messy. Instead, use a glue spreader to evenly apply glue to all of the boards at once.
4.
Food safe glue for cutting boards
When it comes to cutting boards, there are two main types: edge grain and end grain. Edge grain cutting boards are made by joining together pieces of wood with their grain running in the same direction. End grain cutting boards are made by joining together pieces of wood with their grain running in opposite directions.
End grain cutting boards are often thought to be superior to edge grain cutting boards because they are less likely to dull knives and they provide a more stable surface for cutting. However, end grain cutting boards can be more difficult to make.
One of the most important steps in making an end grain cutting board is gluing up the pieces of wood.
This process can be tricky, but with a little patience and attention to detail, it can be done successfully.
Here are the steps you need to take to glue up an end grain cutting board:
1. Cut the pieces of wood that you will be using to the same size.
How to make an end grain cutting board
If you’re looking for a tough, durable cutting board, look no further than one made from end grain. End grain boards are made by gluing together blocks of wood so that the end of each piece of wood is facing up. This results in a cutting board that is very strong and resistant to slicing and chopping.
To make your own end grain cutting board, you’ll need a few supplies. First, you’ll need enough wood to make the cutting board. The size of the board will depend on how many pieces of wood you’re using.
You’ll also need wood glue and clamps. Start by cutting the pieces of wood to the desired size. Then, apply a generous amount of wood glue to each piece of wood.
Be sure to get glue on all sides of each piece. Once the glue is applied, stack the pieces of wood on top of each other so that the end grain is facing up.
Best glue for cutting boards
End grain cutting boards are made by gluing blocks of wood together so that the end grain of the wood is exposed on the surface of the cutting board. This type of cutting board is very durable and can withstand a lot of wear and tear. When gluing up end grain cutting boards, it is important to use a strong adhesive and to clamp the boards together securely.
Here are instructions on how to glue up end grain cutting boards:
1. Cut the wood into blocks that are the same size. The blocks should be about 2 inches wide and 2 inches long.
2. Spread a generous amount of adhesive on one of the blocks of wood.
3. Place another block of wood on top of the first block, aligning the edges.
4. Repeat steps 2 and 3 until all of the blocks of wood are glued together.
5. Place the clamps on the cutting board and tighten them down.
Gorilla glue for cutting boards
When gluing up an end grain cutting board, there are a few things to keep in mind. First, it is important to use a strong adhesive. Second, the boards must be clamped together tightly in order to prevent warping.
Third, it is best to use dowels or other reinforcement in the center of the board for extra strength.
Here are the steps for gluing up an end grain cutting board:
1. Choose the boards that you will use for your cutting board.
Make sure that the boards are of the same thickness and that the ends are cut squarely.
2. Spread a generous amount of adhesive on one of the boards. Be sure to spread the adhesive evenly.
3. Place the other board on top of the first, aligning the edges.
4. Clamp the boards together tightly, using as many clamps as necessary.
5. Allow the adhesive to dry completely.
Cutting board finish
When it comes to gluing up end grain cutting boards, there are a few things that you need to keep in mind. First, you need to make sure that the boards are flat and level. If they’re not, then the end grain cutting board will not be level and it will be difficult to use.
Second, you need to use a strong adhesive. We recommend using Titebond III Ultimate Wood Glue. It’s a water resistant glue that will hold up well to the elements.
Third, you need to clamp the boards together. We recommend using at least four clamps, and you can use as many as you need to make sure the boards are securely glued together. Finally, let the glue dry for at least 24 hours before using the end grain cutting board.
Conclusion
It’s easy to make an end grain cutting board! You just need a few supplies and a little bit of time. First, you’ll need to gather your supplies.
You’ll need wood glue, clamps, sandpaper, and a saw. Next, you’ll need to cut your boards to the desired size. Once your boards are cut, you’ll need to sand them down to make sure they’re smooth.
Then, you’ll apply glue to the boards and clamp them together. Make sure to let the glue dry completely before using your cutting board.