How To Make Basket Weave Cutting Board? 9 Easy Step
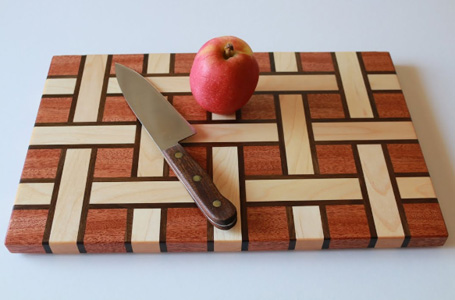
If you’re a fan of unique and creative cutting boards, then learning how to make a basket weave design is a must-try project. Not only does it add a touch of elegance to your kitchen, but it also provides a functional surface for all your chopping and slicing needs.
In this step-by-step guide, we’ll walk you through the process of creating your very own basket weave cutting board. From selecting the right wood to assembling the pieces in an intricate pattern, we’ll cover all the details you need to know. So grab your tools and let’s get started on this fun and rewarding woodworking project!
How To Make Basket Weave Cutting Board?
Creating a basket weave pattern on a cutting board involves cutting and arranging different strips of wood to form an intricate design. Here’s a general guide on how to make a basket weave cutting board:
Materials You’ll Need:
- Hardwood strips of various species and colors
- Table saw or miter saw
- Planer (optional)
- Wood glue
- Clamps
- Sandpaper (various grits)
- Food-safe finish (such as mineral oil or food-safe butcher block oil)
- Safety equipment (goggles, ear protection, dust mask)
Steps:
- Select Wood Strips: Choose hardwoods of varying colors to create the basket weave pattern. Common choices include maple, walnut, cherry, and oak. Make sure the wood is of uniform thickness and free from defects.
- Prepare the Strips: Cut the hardwood strips into uniform widths and thicknesses. A typical width could be around 1/4 to 3/8 inches. You’ll need an equal number of strips for the horizontal and vertical parts of the weave. For instance, if you plan to make a 4×4 weave pattern, you’ll need 16 strips (8 horizontal and 8 vertical).
- Create the Weave Pattern:
- Arrange the vertical strips side by side on a flat surface, leaving a small gap (about the thickness of a strip) between each strip.
- Weave the horizontal strips through the vertical strips in an over-under pattern. Start by going over the first vertical strip, then under the second, over the third, and so on.
- Continue alternating over and under until you’ve woven all the horizontal strips.
- Glue-up:
- Once you’re satisfied with the woven pattern, apply a thin layer of wood glue to the edges of the strips where they intersect. Make sure to spread the glue evenly.
- Carefully press the strips together, ensuring they’re aligned properly. Use clamps to hold the strips in place while the glue dries. Wipe off any excess glue that squeezes out.
- Allow Glue to Dry:
- Follow the glue manufacturer’s instructions for drying time. It’s essential to allow the glue to cure fully before moving on to the next steps.
- Trim and Flatten:
- After the glue has dried, use a table saw or a miter saw to trim the edges of the woven panel. This will create a clean, straight edge.
- Plane or Sand:
- Depending on the quality of your cuts and the alignment of the strips, you might need to plane the surface to ensure it’s perfectly flat. Alternatively, you can use sandpaper on a flat surface to achieve the same result.
- Finish:
- Sand the entire surface of the cutting board to a smooth finish. Start with a coarser grit and gradually move to finer grits.
- Apply a food-safe finish, such as mineral oil or food-safe butcher block oil, to protect and enhance the beauty of the wood. Follow the manufacturer’s instructions for application and drying times.
- Final Touches:
- Once the finish has dried, your basket weave cutting board is complete! Make sure to clean it thoroughly before using it for food preparation.
Remember that this project requires precision and attention to detail, so take your time to ensure each step is done accurately. Always prioritize safety by using appropriate protective gear and tools.

Credit: www.youtube.com
How do you weave a cutting board?
Weaving a cutting board involves creating a decorative pattern by interlacing strips of wood. This technique adds an intricate design element to the cutting board’s surface. Here’s a step-by-step guide on how to weave a cutting board:
Materials You’ll Need:
- Hardwood strips of different colors and species
- Wood glue
- Clamps
- Table saw or miter saw
- Planer (optional)
- Sandpaper (various grits)
- Food-safe finish (such as mineral oil or food-safe butcher block oil)
- Safety equipment (goggles, ear protection, dust mask)
Steps:
- Prepare the Wood Strips:
- Choose hardwoods of different colors and species. Plan for an equal number of horizontal and vertical strips for the weave. Common choices include maple, walnut, cherry, and oak.
- Cut the hardwood strips to a uniform width and thickness. Strips that are around 1/4 to 3/8 inch wide work well for weaving.
- Create the Weave Pattern:
- Lay out the vertical strips side by side on a flat surface, leaving a small gap between each strip (about the width of a strip).
- Begin weaving the horizontal strips through the vertical strips in an over-under pattern. Start by going over the first vertical strip, under the second, over the third, and so on.
- Continue alternating over and under until you’ve woven all the horizontal strips. The result should be a woven panel.
- Glue and Clamp:
- Once you’re satisfied with the woven pattern, apply a thin layer of wood glue to the edges of the strips where they intersect. Make sure to spread the glue evenly.
- Gently press the strips together, aligning them properly. Use clamps to hold the strips in place while the glue dries. Wipe off any excess glue that oozes out.
- Allow Glue to Dry:
- Follow the glue manufacturer’s instructions for drying time. Ensure that the glue is completely dry and cured before proceeding.
- Trim and Flatten:
- After the glue has dried, trim the edges of the woven panel using a table saw or miter saw. This step creates clean, straight edges for your cutting board.
- Plane or Sand:
- Depending on the quality of your cuts and the alignment of the strips, you may want to plane the surface to achieve a perfectly flat result. Alternatively, use sandpaper on a flat surface to even out the surface.
- Finish:
- Sand the entire surface of the cutting board to a smooth finish. Start with a coarser grit and progress to finer grits for a polished surface.
- Apply a food-safe finish, like mineral oil or food-safe butcher block oil, to protect the wood and enhance its appearance. Follow the manufacturer’s guidelines for application and drying times.
- Final Touches:
- Once the finish is completely dry, your woven cutting board is ready to use! Before using it for food preparation, ensure it’s thoroughly cleaned.
Remember, weaving a cutting board involves precision and attention to detail. Take your time during each step to achieve the best results. Always prioritize safety by using proper safety gear and tools.
How do you make an end grain basket weave cutting board?
Creating an end grain basket weave cutting board involves weaving strips of wood together in a pattern and then arranging those woven sections to create the end grain surface of the cutting board. This type of cutting board is not only functional but also visually appealing. Here’s a step-by-step guide to help you make an end grain basket weave cutting board:
Materials You’ll Need:
- Hardwood strips of various species and colors
- Wood glue
- Clamps
- Table saw or miter saw
- Planer (optional)
- Belt sander or sandpaper (various grits)
- Food-safe finish (such as mineral oil or food-safe butcher block oil)
- Safety equipment (goggles, ear protection, dust mask)
Steps:
- Prepare the Wood Strips:
- Choose hardwoods of different colors and species. You’ll need strips for both the woven sections and the border of the cutting board.
- Cut the strips to the desired width and thickness. For the basket weave pattern, strips around 1/4 to 3/8 inch wide are suitable. The thickness should be uniform across all strips.
- Create the Weave Pattern:
- Arrange the vertical strips side by side on a flat surface, leaving a small gap between each strip.
- Begin weaving the horizontal strips through the vertical strips, alternating over and under. Start by going over the first vertical strip, under the second, over the third, and so on.
- Continue weaving until you’ve completed the desired woven section. Repeat this process to create multiple woven sections.
- Glue and Clamp the Woven Sections:
- Apply a thin, even layer of wood glue to the edges where the woven strips intersect.
- Press the woven sections together to form a larger panel. Use clamps to hold the sections firmly in place while the glue dries. Wipe off excess glue.
- Allow Glue to Dry:
- Follow the glue manufacturer’s instructions for drying time. Ensure the glue is fully cured before moving on.
- Trim and Arrange:
- After the glued sections are dry, trim the edges of the woven panel using a table saw or miter saw to create clean, straight edges.
- Arrange the woven panels next to each other to form the end grain surface of the cutting board. Leave a small gap between the panels for the border.
- Glue and Clamp the Border:
- Cut strips of wood to create the border for the cutting board. The width of the border strips should be consistent with the thickness of the woven sections.
- Apply glue to the edges of the woven panels where they’ll meet the border. Attach the border strips around the woven panels to frame the cutting board.
- Use clamps to hold the border strips in place while the glue dries. Clean off any excess glue.
- Trim and Flatten:
- Once the glue is dry, trim any excess from the border strips and make sure the edges are even.
- Plane the surface if necessary to achieve a flat and even surface. Sand the entire board to smooth out any imperfections.
- Finish:
- Sand the entire cutting board to a smooth finish. Begin with a coarser grit and gradually move to finer grits.
- Apply a food-safe finish, such as mineral oil or food-safe butcher block oil, to protect and enhance the wood. Follow the manufacturer’s instructions for application and drying times.
- Final Touches:
- After the finish has dried, your end grain basket weave cutting board is ready to use and display.
Creating an end grain basket weave cutting board requires precision and patience. Take your time to ensure each step is done accurately for the best results. Always prioritize safety by using appropriate protective gear and tools.
How do you glue basket weave cutting boards?
If you’re looking for a cutting board that’s both functional and stylish, a basket weave is a great option. Here’s how to make your own basket weave cutting board:
1. Cut two pieces of wood to the desired size for your cutting board. You’ll need one piece for the top and one for the bottom.
2. Cut evenly spaced notches into the top piece of wood. These notches will help you align the pieces of wood when you’re weaving them together.
3. Cut strips of wood that are the same width as the notches you just cut. You’ll need enough strips to weave across the entire top piece of wood.
4. Start weaving the strips of wood into the notches, working your way across the board.
5. Once all of the strips are in place, glue the bottom piece of wood to the back of the woven top piece.
How do you make a herringbone cutting board pattern?
Basket weave cutting boards are a beautiful and unique addition to any kitchen. They are also very easy to make! Here is a step by step guide on how to make your very own basket weave cutting board.
1. Start by cutting your wood into equal sized pieces. You will need 6 pieces for the top and bottom of the cutting board, and 12 pieces for the sides.
2. Next, take two of the pieces for the top and bottom and glue them together at the edges. Repeat this step for the remaining top and bottom pieces.
3. Now take 4 of the side pieces and glue them together at the edges to form two long strips.
4. To create the basket weave pattern, alternate gluing the side pieces and the top and bottom pieces together.
Start and end with a side piece. Make sure that the edges are aligned as you glue them together.
How to make pattern cutting board
Basket weave cutting boards are a great way to add a touch of style to your kitchen. They are also a great way to protect your countertops from scratches and damage. Here are a few tips on how to make your own basket weave cutting board.
1. Start by measuring the area where you would like to place your cutting board. Cut a piece of plywood or MDF to this size.
2. Next, cut strips of wood that are 1-2 inches wide and the same length as your plywood or MDF piece.
3. To create the basket weave pattern, alternate attaching the strips of wood horizontally and vertically. Start by attaching a strip horizontally, then attach a strip vertically, and so on. 4. Once all of the strips have been attached, sand the entire surface of the cutting board to smooth out any rough edges.
5. Finally, finish the cutting board by applying a food-safe sealer.
Conclusion
This basket weave cutting board is a great way to add a unique touch to your kitchen. It’s a simple project that doesn’t take much time or materials, and it’s a great way to show off your woodworking skills. The key to making a basket weave cutting board is to use thin strips of wood so that the weave is tight and the board is strong.
You can find thin strips of wood at most hardware stores, or you can cut them yourself with a saw. Once you have your strips of wood, all you need to do is glue them together in a basketweave pattern. Once the glue is dry, you can finish the board with a food-safe finish.
This is a great project for any level of woodworker, and it’s a great way to add a unique touch to your kitchen.